Wednesday, October 30, 2013

TUTORIALS TIPS AND TIDIBTS #71


Welcome to 

TUTORIALS TIPS AND TIDBITS #71

Before we  begin tonight... I have an important question...

Did you vote for StoneGable as 2013 Home Blog Of The Year? I'm in the FAMILY category.

It's easy, will take about 10 seconds and... I sure could use everyone's vote!
And you could win $500.00 too!

 Go to LAMPS PLUS (click) on Facebook. "Like" them if you have not already, and click on the icon under the header that sorta looks like this...


follow the directions and vote for me in the FAMILY category.

Last I heard, I was in first place by just a few votes! Come on friends, push me over the top!

YOU CAN VOTE EVERYDAY for StoneGable. I would appreciate to soooooo much!

Thanks bunches and bunches!!!
XOXO

Now let's see some of last week's creativity...


Liz at LOVE GROWS WILD shared her simply beautiful FALL DECORATED KITCHEN


A kitchen beautifully decorated for Fall with sheet music garlands, mini pallet art, and more!


Oh yummy! CHICKEN POT PIE (THE EASY WAY) from the Style Sisters. This is a keeper recipe!


One thing I love about TTT is finding new-to-me blogs. Courtney from GOLDEN BOYS AND ME is a great example. If you haven't visited this blog you must. Fabulous!
Courtney is sharing her gorgeous FALL MANTEL


Fall Mantel with stenciled pallet sign via www.goldenboysandme.com


Here's a beautiful GIRLS WANT PEARLS MASK from TARNISHED ROYALTY.  What girl wouldn't want to wear this to a Mascaraed Ball? 


I'm in love with Michelle from MICHELLE LEA DESIGNS fresh FALL PARTY IDEAS
From table designs, to food and even party game ideas, just follow the post and ta-da, a great fall party!


Kerry is a girl after my own heart! She must have a pillow addiction too! She is showing off her LIGHT AND BRIGHT FALL PORCH AND PAINTED PUMPKIN PILLOW. Head over to HOMECRUSH to be inspired!


homecrush fall front porch


Mindi from MY LOVE 2 CREATE is decked out in Halloween fun. She made a spooktacular RUSTIC HALLOWEEN SIGN...
Boo!


MyLove2Create Rustic DIY Halloween Sign


WITH A DASH OF COLOR shared how to put together a fall vignette, WHEN PUMPKINS INSPIRE. She covered books with some great burlap... love it! Thanks, Poppy!


I am WILD about Nici's post, THE ANATOMY OF AN UPCYCLED SWEATER. She showed us how to make 8 different diy projects from ONE sweater! Head over to POSED PERFECTION and check it out!!!!


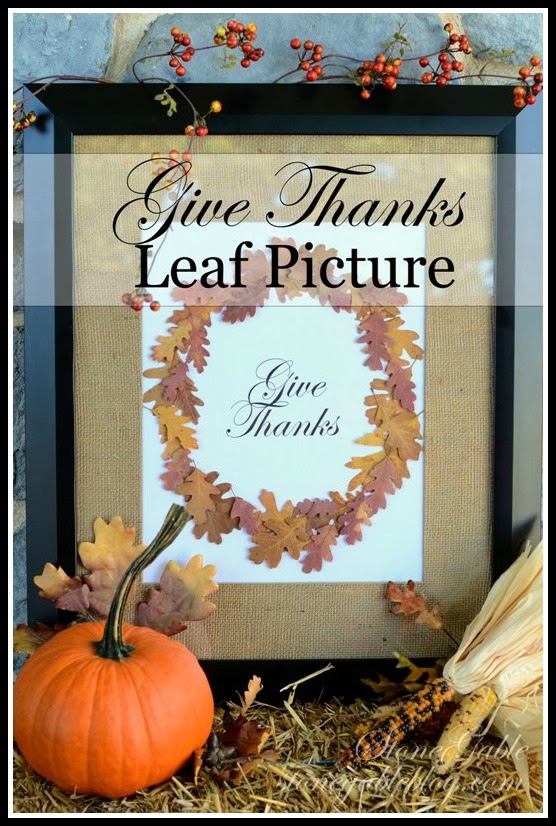
This week I am sharing a GIVE THANKS PRESSED LEAF PICTURE TUTORIAL. Easy to make and it would make a very thoughtful gift if your Thanksgiving is being hosted by someone else!


If you have been featured, please grab a "featured" button on my sidebar!


* Please link your post using your permalink
* Please link back to TUTORIALS TIPS AND TIDBITS in the body of your post. You can find my button TTT button on my sidebar. No mass link page, please!
* Visit other TTT participants... let's all visit at least 3 others and comment
* Please link up only photographs that belong to you.
* It would be nice if you would follow me, thanks!
* If you would like to pin an image on Pinterest, please pin it from the original source, not StoneGable
* By participating, you are giving me permission to use your linked post and picture as a featured link in an upcoming TUTORIALS TIPS AND TIDBITS. I may also use your post and any image to alter for a TTT title page and facebook announcement.


GIVE THANKS PRESSED LEAF PICTURE TUTORIAL


Let's talk turkey! Well, not turkey literally... let's talk about Thanksgiving!

I recently did a survey on my FACEBOOK PAGE asking "What is your favorite holiday",and the majority of those that answered said Thanksgiving was their favorite!

Yet, I often feel that Thanksgiving gets squeezed out of the holiday limelight by Halloween and Christmas!

Here's an easy tutorial to help celebrate Thanksgiving and it's true meaning...


I found a burlap matted frame on sale at AC Moore and knew I would use it for the Thanksgiving Picture.

I also recently ordered a package of pressed oak leaves from NATURE'S PRESSED FLOWERS.


Frame + pressed oak leaves + Thanksgiving = Give Thanks Pressed Leaf Picture


What an easy and quick project... I'll show you how!


STONEGABLE GIVE THANKS PRESSED LEAF PICTURE

1 large frame
bristol board (from craft store)
pressed leaves
glue tape (like scrapbooker's use)
raised glue dots (again, scrappbooker's supplies)
computer and printer


1. Because my frame was large I bought a pack of Bristol Board from A.C. Moore. If your frame in smaller, you could use any heavy paper such as card stock.

2. Make the saying "GIVE THANKS" on a computer program, like Pic Monkey and print it out on a computer.


3.Using the GIVE THANKS paper, cut a circle large enough to fill the center of your picture, centering the words GIVE THANKS. 

I used an 8 inch plate as a template for my circle.


4. Sandwich the Bristol board between the cardboard backing and the mat of your picture and glue it down using glue tape or double sided sticky tape.


5. Center the cut out GIVE THANKS circle in the middle of thr mat and glue down with glue tape.


6. Using pressed leaves arrange a single layer of leaves around the Give Thanks circle. When it looks pleasing to you glue the leaves down with glue tape.


Now it's time to layer the leaves for a 3D effect. 


7. Put a glue dot on the back of a leaf and begin to fill in the wreath. 

8. Layer leaves flat and raised.


9. Here is a picture of half the wreath done. Continue around the circle until it is filled in with flat lying and raised leaves.


EASY PEASY!


I'm hanging my GIVE THANKS PRESSED LEAF PICTURE in the foyer... so that everyone who comes to StoneGable will be reminded to GIVE THANKS!


Remember to

Pin It


Tuesday, October 29, 2013

LIVING ROOM CURTAINS


I worked all last weekend to finish the curtains in the living room.

 I've was dreading and putting off this project for at least 6 months! And they were actually quite easy to make. 

 I'm so happy they are finally hanging in the living room...


They match the curtains in the dining room across the foyer.

We are working on the foyer now... can't wait to show it to you!


You can read about my dining room by clicking HERE


The windows in the living room and dining room are tall and close together and I didn't want to have a lot of curtain fabric hanging on the walls or over the windows. 

A designer friend, suggested that the two windows be treated as one... and the third window be left untreated.

 Brilliant idea!


The curtains were hung to the height of the key in the arch of the window... and fall to the floor is soft fabric puddles.

The hardware to hang the curtains was a mish-mosh of on sale parts from 3 different stores. I painted them to match and the worked out well!

Matching hardware not on sale would have cost a fortune! I love a bargain, so I didn't mind painting them!


\


You can see the damask-like pattern on the linen curtains behind the lamp.


The two brass lamps on either side of the sofa are very near and dear to my heart! They came from Japan.

My dad was stationed on a remote base in Japan when I was a very little girl and he brought these beautiful solid brass lamps home with him. They are HEAVY!

When Bobby and I moved into our second home, my mother gave them to me.

They are one of my most cherished possessions!


The room is finally coming together. We started totally redoing this room by putting the hardwood floors in. I think that was 11 month ago!

If you are a StoneGable reader you know that Bobby and I do all the work ourselves... so we are S-L-O-W!


All of the seasonal decorations in this room were removed and are sitting in the study. Tomorrow StoneGable is being photographed for a magazine!

So EXCITED!


I'm still looking for a big french hutch for the wall by the french doors... and I need to paint the grandfather clock.  

Then I will ALMOST be done! I'm also looking for a couple of small pictures, baskets and some extra embellishments for the tabletops.

But is a room EVER really done?


Remember to

Pin It


Monday, October 28, 2013

ON THE MENU MONDAY~ WEEK OF OCT 28, 2013


Happy Trick Or Treat! 

Here at StoneGable, we don't have many trick-or-treater. So sad!
Because we live in the middle of corn fields and have no close neighbors, we get very few costumed kids excited for candy!

I miss that...


When we lived in our first two homes we had hoards of trick-or-treaters. Bobby loved putting on his dinosaur costume to hand out candy to the kids.

 One year, he scared our little next door neighbor so badly when he opened the door, she cried and went straight home and didn't finish trick-or-treating! And the dinosaur costume wasn't even scary!

I made my children's costumes every year. Christopher would plan for months and months... very serious about what he would be. It was usually a pirate, Robin Hood, a pirate, a cute vampire, Zoro, a pirate, Rocky, a pirate... to this day Christopher still has pirate aspirations!

Jacqueline loved to be a cat or a "bobby socks girl". We had a few years in a row of cat costumes. She also was a bride, cute witch, lamb, etc. Almost every year when I asked her what she wanted to be she would say,  "a cat"!


When our son was small he would get so excited to trick-or treat that he would wear himself out and fall asleep in the wagon I pulled the children around the neighborhood in. His sister, to her extreme embarrassment, had to ask for 2 treats... one for her and one for her sleeping brother!

And for many years, Christopher, would not go near houses that played scary music. So again, our little cat would have to get treats for her brother too!


Just this morning, my Jacqueline called and asked if I could find her Tinkerbell costume. I made it for her when she was a sophomore in high school... she wants to wear it to a party. I think her husband is either going to be Peter Pan or Captain Hook. So later tonight I'll be digging around the cedar closet!

I know this is long and very off topic, but trick-or-treat brings up so many sweet and wonderful memories!


Because we get so few trick-or-treaters, you know what that means.... more candy for me!!!!

I hope you get bags and bags of treats and lots of fun memories!

BE SAFE OUT THERE!

Now, here's what's ON THE MENU...


MONDAY~ SOUP DAY
Crusty Bread and Assorted Cheeses


TUESDAY
Mashed Potatoes


WEDNESDAY~SLOW COOKER DAY


THURSDAY~TRICK OR TREAT!
OLD FASHIONED YANKEE POT ROAST
Leftover Candy (hopefully Reese's Peanut Butter Cups!)


FRIDAY


SATURDAY


SUNDAY
Sauteed Cabbage


Remember to

Pin It


Sunday, October 27, 2013

DRAW YOUR LINE... WITH INDELIBLE MARKER!


Before my children learned how to drive, they were a captive audience.

Because they were very active in sports and ballet and cheerleading and church and drum lessons and the sort, we spent A LOT of time in the car! Lot and Lots of time! 

There they were, safely strapped into the back seat ... a captive audience. We talked about everything under the sun and I imparted my very best wisdom to them from the driver's seat...


I loved even the thought of a long drive with my kids. We would talk and laugh and sing and pray and connect and learn and have some pretty deep conversations!

We did not shy away from tough conversations, we encouraged them. We always felt, as parents, we wanted our children to hear a true and wise and biblical view on every topic before the outside world screamed in their precious ears!

The sensitive topic of the birds and the bees was no exception! I don't every remember having "THE TALK" with our kiddos... it was more of an ongoing conversation from the time they were very little. It was natural. When our children asked, and boy did they ask, we would answer and have the most marvelous Godly conversations!

***********

Right now I am teaching the book of Daniel. 

Daniel was a young Jewish lad. He lived during a horrific time in Israel's history. A time when the Babylonian empire destroyed the Southern Kingdom of Judah and Jerusalem and the Holy Temple. Daniel was captured at the age of about 15 and ripped from his family. He was taken away to live in the land of his captors and as far as it is known, never returned to his beloved home.

Unspeakable things happened to Daniel!
 He lost his home, his family, his name, his country, his religious practices, his place of worship, his culture, his language, his friends and was probably castrated... make a unick at the age of 15!

But Daniel not only survived all that trauma... he thrived... and did so well that he was promoted and loved by many kings! He thrived by never giving into the religion of the Babylonians... he thrived by being faithful to God and God's ways in an idol worshiping debased society!

At times Daniel's faith caused him big problems! Life threatening problems... like being thrown into a lion's den. And he faced them never turning away from God... but clinging onto Him all the more!


God was with Daniel! And Daniel knew exactly where his strength, protection and eternal well being came from. Daniel remained faithful to God through all the bad, terrible times and all the good, as well!

*************

I remember one particular car ride.  I had picked up my daughter and son after school ready to chauffeur them to some activity. There they were, safely strapped in and a captive audience.  


Although I can't remember how the conversation started, I certainly remember the topic! One of my 7th grader's classmates was having sex.


So sad, but a perfect opening for a discussion with my captive audience!  We talked at length about "girls have sex for love and boys love to have sex". We talked about hormones and heady feelings and reputations  and regrets.

And we talked about "THE LINE"! I would talk about "THE LINE" a thousand times to my kids, even and especially, when they were no longer a captive audience.

I said to my kids, who were intently listening, that the time to decide to have sex was not when they were in the back seat of a car with a boyfriend or girlfriend. Because when they were in that situation they had already made a fatally bad decision and probably crossed quite a few LINES!

I told them the time to decide was now... way before those situations happened to them. I told them to think about where they were going to draw "THE LINE"... a LINE they would never cross... no matter what! 

I asked them to think about were God would draw that line. We talked about how God's line and their line should be the same... I told them, where God draws a line they should draw their line on top of His with INDELIBLE MARKER!

After dropping my children off at their activities, I sat in the parking lot and prayed!

 I prayed for my children and "THE LINES" they would draw in their lives!

********

In chapter 1 of Daniel our bible study met him already a captive of Babylon, taken into the a three year long brainwashing program. Here he was facing a trial. One of many he would face in his long lifetime!

And how did Daniel face this trial and every other situation in his life? 


DANIEL MADE UP HIS MIND NOT TO DEFILE HIMSELF...
Daniel 1:8


Daniel had drawn  a LINE too! A LINE that was God's LINE. A line that, if crossed, would cause defilement.

"THE LINES" Daniel drew kept Him in God's will his whole life.

I love the bible version that says...


DANIEL PURPOSED IN HIS HEART NOT TO POLLUTE HIMSELF

In the day's of Daniel the mind, the will, the intellect and the emotions were all called the heart.

So, Daniel placed BOUNDARY LINES in  his mind, will, intellect and emotions. Pretty awesome!


I think young Daniel has a very big lesson for us all... no matter what our age! 

We all need to think about THE LINES we draw in our lives! Lines not to defile or pollute ourselves!

Today, I'm asking you to take a good look at your LINES. Where are they? Do some need to be reset or  drawn for the first time? Do you even know where God's LINES are drawn? 

God is very clear about our abundant freedom and sin in His Word. First, we need to read and and determine to obey God's Word! 


Be like  children... a captive audience by the Word of God... ready to love God's word and align your life to it!  We all look for the boundary LINES in life. Find out where the real one's are...

and draw YOUR LINES in INDELIBLE MARKER over them!


Friday, October 25, 2013

PUMPKIN BREAD IN A JAR


If October were a food it probably would be pumpkin bread...pumpkin bread with a crumb topping.

Delicious, super moist, and full of autumn flavors!

Fall in a jar! 


Don't you love just about any food in a jar? I sure do! 

I'm serving this pumpkin bread as part of a fall picnic... but it can be preserved by screwing on a ball jar lid when it comes out of the oven. Wonderful idea!


STONEGABLE PUMPKIN BREAD IN A JAR

3 1/2 cups flour
3 cups white sugar
1/2 tsp baking powder
2 tsp baking soda
1 tsp cinnamon
1 tsp nutmeg
1 tsp cloves
1 1/2 tsp salt
4 eggs, slightly beaten
2 cups pumpkin (I use Libby's)
1 cup vegetable oil
2/3 cup warm water

crumb topping
1/2 cup sugar
1 cup flour
1/3 cup butter, softened

Preheat oven to 325 degrees.

Combine flour, sugar, baking powder, baking soda, cinnamon, nutmeg, cloves and salt in a medium bowl. Whisk to mix.

In a large bowl, using an mixer, combine eggs, pumpkin, oil and water.  Gently mix the dry ingredients into the wet ingredients a third at a time.

Generously grease pint and half pint jars ( I made 4 pint and 4 half pints).


Using a large funnel, layer batter then crumb topping, then more batter and crumb topping.  Ball jars should be filled 2/3 full if you are not going to use the caps, and a little more than 1/2 full if you are using the caps to screw on the jars to preserve the pumpkin bread.


Wipe off any excess batter or crumb topping around the rim.


Put the jars on a parchment lined baking sheet and bake for 40 minutes. Test for doneness. If they are still wet, continue to bake until done.


To preserve the pumpkin bread, immediately screw on an unused lid and ring. The jar should seal. I'm not sure how long the shelf life is. I have read and heard many different shelf life estimates. 


These would make great hostess gifts or a goodie for a college student... or to keep on hand for company!


Remember to

Wednesday, October 23, 2013

TUTORIALS TIPS AND TIDBITS #70


WELCOME TO...

TUTORIALS TIPS AND TIDBITS #70

I'm loving all the fall decor that is showing up this time of year! If you come here looking for ideas, especially for fall, you will leave with a ton of creative ideas and inspiration.


Here's just a few great posts from last week to get us warmed up...


Gail from PURPLE HUES AND ME has a wonderful way to BLEACH PINECONES. These are gorgeous!


Oh, YUMMY! Look what Melisa at DESIGN EAT REPEAT make for us...MINI CINNAMON BREAKFAST CASSEROLES


Skinny (Mini) Cinnamon Breakfast Casseroles


Shirley, from HOUSEPITALITY DESIGNS has a beautiful FALL FRONT PORCH. Let's all take the tour!


2013 Fall Front Porch


Just wait till you see this ELEGANT AUTUMN TABLESCAPE from the Tablescaper. Gorgeous!


olive & white01


Here's another wonderful FALL PORCH TOUR tour from Debbie at CONFESSION OF A PLATE ADDICT. What style!


CONFESSIONS OF A PLATE ADDICT Fall Porch Tour 2013


This GIVE THANKS TABLE RUNNER by Daniela from FRUGAL AIN'T CHEAP is perfect for Thanksgiving!


Can you see my raised hand. The question was, "Who wants one of Aimee's PUMPKIN PIE SNICKERDOODLE BARS"? Head over to SEE AIMEE COOK for the recipe!


The STYLE SISTERS show us how to change a chair with their NO SEW DINING ROOM CHAIR MAKEOVER


Becca from ADVENTURES IN DECORATING shares her beautiful southern home's FALL FRONT PORCH too. Must have been a Fall Front Porch Showcase!


This week I'm sharing a BURLAP WREATH TUTORIAL. I made this wreath in 15 minutes! Really!


If you have been featured, please grab a "featured" button on my sidebar!


* Please link your post using your permalink
* Please link back to TUTORIALS TIPS AND TIDBITS in the body of your post. You can find my button TTT button on my sidebar. No mass link page, please!
* Visit other TTT participants... let's all visit at least 3 others and comment
* Please link up only photographs that belong to you.
* It would be nice if you would follow me, thanks!
* If you would like to pin an image on Pinterest, please pin it from the original source, not StoneGable
* By participating, you are giving me permission to use your linked post and picture as a featured link in an upcoming TUTORIALS TIPS AND TIDBITS. I may also use your post and any image to alter for a TTT title page and facebook announcement.